It’s a quiet winter Sunday and I’m puttering about the house and working on various projects (cleaning, organizing, laundry, etc). It’s freezing outside and the weather is manic; alternating between snow flurries and sunshine. I’ve got a chill in my bones that I can’t quite shake, and no amount of coffee seems to do the trick. I click back and forth between the Packers game and the Golden Globes, as I can’t decide which is more depressing.
I think it’s the perfect day to make a grilled cheese sandwich.
Why? Because grilled cheese is the perfect winter meal.
In addition, the grilled cheese sandwich is a prime example of a time-tested culinary rule: melty cheese + bread = culinary magic. (If interpreted loosely, this rule also applies to pizza, quesadillas, nachos, lasagna, mac n’ cheese, cheeseburgers, etc. You get the idea.)
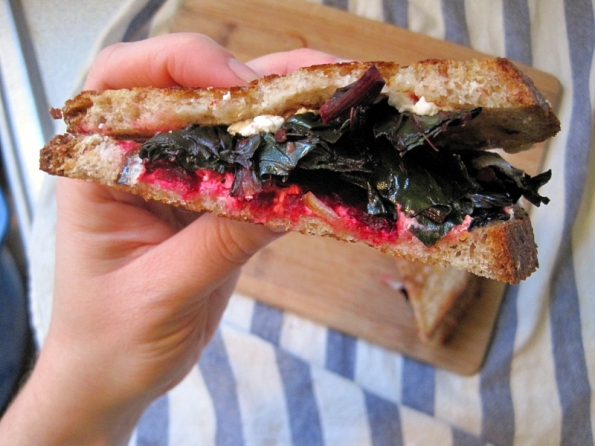
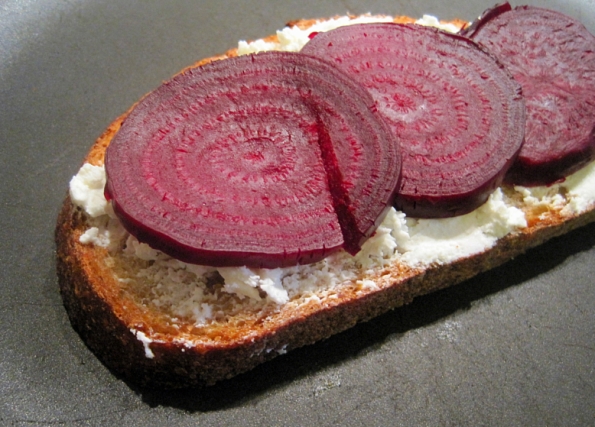
So, this sandwich is essentially a dressed up version of the bread and cheese rule. I took a couple slices of quality bread and added goat cheese, roasted beets, wilted chard, caramelized onions, along with a healthy dollop of creamy horseradish.
The result? My new favorite winter meal. I’m not kidding. This sandwich is a wonderful tribute to the season, and utilizes some of my favorite winter vegetables: beets, onions, and chard. The creamy goat cheese melds together perfectly with the earthy winter veggies, and the horseradish gives the sandwich just the right amount of punch.
If this is what winter tastes like, then I hope winter lasts forever.
(OK, maybe I’m exaggerating a bit with that last sentence. At the very least, this sandwich makes the winter much more tolerable.)
Wintery Grilled Cheese: With Goat Cheese, Roasted Beets, and Wilted Chard.
(Inspired from a similar sandwich I consumed at Bunk Bar. Thank you, Tommy. You rule.)
Makes 4 hearty sandwiches.
Ingredients:
8 slices quality bread (I splurged on Grand Central Bakery’s Sliced Campagnolo. So good.)
4 ounces goat cheese (Chevre), room temperature
3 cups of rainbow chard, roughly chopped
1 large yellow onion, sliced thinly
2 medium-large beets
Horseradish, to taste
Method:
Roast the beets: Preheat oven to 400 degrees. Wash beets and trim off beet greens, leaving a 1/2 inch “stem”. Wrap each beet individually in tin foil. Once the oven is hot, place wrapped beets directly on the oven rack (or on a pan, if you’d rather). Roast for 40 minutes (up to an hour), until beets are soft all the way through when pricked with a fork. Remove from oven and allow to cool. Once cool enough to handle, unwrap beets and remove skin. The skin should come off easily (I usually use a paper towel and gently rub off the skin). Set beets aside.
While the beets are roasting, caramelize the onions. In a medium size non-stick skillet, heat 1 teaspoon of olive oil over medium-low heat. Once the oil is hot, add in the sliced onions. Allow to cook over medium-low heat, stirring occasionally, until brown and caramelized (about 30 minutes). If they begin to cook too quickly, turn the heat down to low. Remove the onions from the pan and set aside.
In the same skillet (no need to clean it, the onion flavor will just enhance the chard), heat a splash of oil over medium heat. Add in the chopped chard and allow to heat. Stir, and after a minute or two, add one tablespoon of water to the pan. Cover, and turn the heat down to medium-low. Allow the chard to cook like this for 5 minutes. Check on the chard, if the water has evaporated but the chard is still under-cooked, add a bit more water and cook for 2-3 more minutes. I like my chard leaves to be wilted, but I like the chard stems to still retain a bit of crunch. Season with salt and freshly ground pepper. Set aside until ready to make your sandwiches.
Once the beets, chard, and onions have cooked, your sandwiches are ready to assemble!
I trust that you all know how to make a grilled cheese sandwich, so I’m not going to go overboard with instructions. Essentially, spread a (thick) layer of goat cheese on one slice of bread. Top with beet slices, wilted chard, and caramelized onions. Spread creamy horseradish on the other slice of bread (along with a little more goat cheese, if you so desire). Butter the exterior of your bread slices, and cook your grilled cheese sandwiches on a griddle (or non-stick skillet) over medium-high heat. Cook sandwiches for 3-5 minutes on each side, until bread is golden and the goat cheese is warm and ‘melty’.
Note: goat cheese does not “melt” like other cheeses, but it will get warm, gooey, and delicious.
It’s our first recipe swap of 2012, and I’m only a few days late to the party. (Oh well! Better late than never, I suppose…)
As many of you know, I’m part of the Burwell General Store Recipe Swap. The swap consists of 25 foodies and writers from all over the world, and each month we re-interpret a vintage recipe (selected by Christianna of Burwell General Store) and post our creations on the first Sunday of the month.
This month, Christianna selected this recipe for the swap: Zabaglione for Two.
I was a bit flabbergasted by this recipe. First off, I had to google Zabaglione as I had no idea what it was. The images that appeared on my screen horrified me: it looked like a rich, lumpy, custardy mess. Granted, this recipe came at a bad time – I had just started my January detox and was feeling particularly over-sugared from the holidays. I couldn’t stomach the thought of a heavy custard. I decided that I needed to transform zabaglione into something light and healthy.
The only problem was that I could not, for the life of me, figure out how to pull off this transformation. I was stumped.
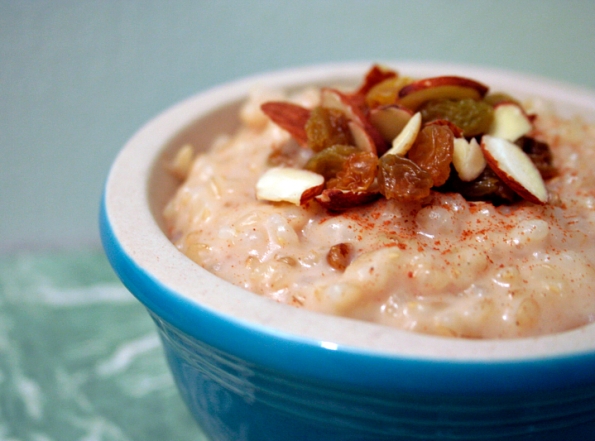
After a lot of thought, I finally decided to make a coconut milk brown rice pudding. It’s vegan, gluten free, and it doesn’t contain much sugar. And, most importantly, it’s easy to digest. It makes my belly happy. And as of right now, a happy belly is a top priority.
I won’t bore you with all of the details, but I do think it is worth mentioning that I have IBS.
Meaning: my stomach hates me.
I’ve tried various medications, elimination diets, fasts, probiodics, kombucha, vitamins, herbs, and more. I’ve been tested for various diseases and allergies, but everything comes back negative. In my opinion, IBS is the diagnosis doctors give you when they can’t figure out what’s wrong with your digestive system. So, I just do my best to take care of myself. I try to listen to my body. I started a detox on January 1st, because I wanted to cleanse after the holidays. I drank a lot of chicken broth and ate a lot of veggies. And the funny/tragic thing is, my stomach felt even worse during the cleanse. I was downright miserable. Nothing I ate or drank (or didn’t eat or drink) seemed to help.
I just didn’t have the heart to cook anything, let alone create a recipe for the swap.
But, I gave it a couple days and gradually I began to feel better. I allowed myself to dream of delicious and tummy-friendly recipes that might work for the swap. And then I remembered an amazing rice porridge I had for breakfast a couple years ago at a local brunch spot in Portland. I specifically remember that I ordered the porridge because I wasn’t feeling well and it was named something clever like “The Belly Pleaser”. It was made with coconut milk and had fresh mango on top. I loved it (and so did my stomach).
So this is my ode to “The Belly Pleaser”. It’s no zabaglione, to be sure. But it is a pudding — a pudding that happens to be vegan, gluten free, low-sugar, and is quite easy on the stomach. It also happens to taste wonderful. And that, my friends, is a fabulous thing.
Coconut Brown Rice Pudding
Adapted from The Witchy Kitchen
Note: This recipe uses pre-cooked brown rice, so make sure you factor that into your cooking time. Once the rice is cooked, however, this recipe takes 5-10 minutes to throw together.
Ingredients:
2.5 cups pre-cooked short grain brown rice
1 can (14 ounces) of light coconut milk
1/4 cup soy milk (or dairy milk)
2 tablespoons sugar
1 teaspoon cinnamon (plus cinnamon stick for garnish)
1 teaspoon vanilla*
1/4 teaspoon nutmeg
3 cardamom pods
1/4 cup golden raisins (plus more, for garnish)
Slivered almonds, for garnish
*I think this recipe would be incredible with real vanilla bean, I just didn’t happen to have any at home when I made this. Vanilla extract works nicely, I just think that real vanilla would be killer.
Method:
Heat coconut milk, soy (or dairy) milk and sugar together in a medium sized pot. Until warm. Whisk in corn starch and vanilla. Add in rice, 1/4 cup of golden raisins, and cardamom pods and bring to a simmer. Stir constantly and reduce heat if necessary. Allow mixture to gently simmer for 4-5 minutes, stirring often.
Once the pudding has thickened, remove from heat. Stir in cinnamon and nutmeg. Serve warm, with a dusting of cinnamon. Garnish with almond slivers and extra golden raisins. Can also be enjoyed cold.
And just like that, life is suddenly normal again.
The holidays have come and gone. The Christmas decor is all packed away. I’m back to sitting at a desk in a cubicle for 40 hours a week. And, of course, since it’s the first week of January I’m doing what every other resolution-making, gym-membership-buying American is doing this week: I’m detoxing.
To be clear, I’m using the term ‘detox’ very loosely. Really, I’m just cutting back on sugar, alcohol, and carbohydrates (and all those other things that taste really good but aren’t actually good for you). Since life has returned to normal, my diet should do the same. It is officially time to say goodbye to holiday treats. As much as I love them, they certainly do not love me: I feel tired, old, and sluggish.
So, I’m going back to square one. I’m going to eat simple, whole foods. I’m going to eat fruits, vegetables, and grains. I’m going to be good to my body. There is no formula; this isn’t rocket science. I’m just going to do the best that I can.
If you’d like to join me, I’ve compiled a list of a few of my favorite “detox” recipes. These recipes have inspired me to eat better, and they’ve certainly made me feel better. Please do let me know if you have any detox recipes that you’d like to share! I’d love to hear your suggestions. Happy new year, everyone. Here’s to healthy, happy living!
POST-HOLIDAY DETOX RECIPES: A FEW OF MY PERSONAL FAVES.
Cleansing Ginger Chicken Soup from Bon Apetit: I made a big batch of this broth last week and I LOVE it. For the first few days after Christmas, I simply drank this ginger chicken broth on its own (alongside a simple kale salad). I still had quite a bit of the broth leftover (I made a giant batch), so I roasted some carrots, fennel, parsnips, celery and onions and added that to the broth, along with some leftover cooked chicken. It made for the best chicken and vegetable soup ever. It is full of flavor and nutrients, and it makes my belly really really happy.
Kale and Peanut Slaw from The Kitchn: I’ve had this recipe bookmarked for ages, but I didn’t get around to making until last week. It’s simple, fresh, filling, and wonderful. (It’s also reminiscent of my all-time favorite salad: Raw Kale Apple Salad.)
Coconut Black Eyed Pea Soup from Boulder Locavore: A new year’s tradition (black eyed peas), transformed into an amazing soup. This soup looks rich, yet bright and refreshing (and healthy!). I will be making this soon.
Detox Salad from Oh She Glows: I’ve not yet made this salad, but how could I not add a salad called ‘Detox Salad’ to my list of detox foods? This salad contains SO many wonderful things, and I plan on making it sometime this week.
Miso Soup from 101 Cookbooks: I’ve made Heidi’s miso soup recipe many, many times. I adore this recipe, as does my stomach.
Vegan Caesar Salad: This is my adaptation of 101 Cookbooks Vegan Caesar salad. It’s lighter than a typical Caesar and uses a mix of greens as opposed to iceberg or Romaine lettuce. It’s much healthier than a typical Caesar, and in my opinion – it tastes every bit as good. The secret? Capers.
Warm Chickpea & Butternut Squash Salad from Smitten Kitchen: I’ve also made this salad a zillion times. I like to eat it alongside hummus & pita, but it can be served on its own as a meal. The Tahini dressing is the key, as it really marries all the flavors together beautifully. This salad is also great leftover (and eaten warm or cold).
Balsamic Roasted Roots with Spinach Sauce from Sprouted Kitchen: I could easily include every recipe from Sprouted Kitchen in my roundup, but this recipe seemed particularly appropriate for the season. Plus, the photos are gorgeous.
Curried Quinoa and Apple Salad: What’s not to like about quinoa with apples, curry, coconut milk, golden raisins and almonds? This is such a simple salad, but it’s full of bright and bold flavors. This is also my favorite weekday lunch recipe.
Spicy Slaw with Shredded Chicken from The Unexpected Harvest: This is a recipe from my dear friend Mari that I’ve had bookmarked for ages. Somehow, I’ve never gotten around to making it! It is a simple cabbage slaw with a spicy dressing, served with shredded chicken and soft boiled eggs. It looks hearty, without being too heavy.
Carrot Soup with Orange and Lemongrass: This might be my favorite soup of all time. It’s spicy and powerful, bold and bright. And, it’s vegan!
Vegetarian African Peanut Stew from Big Girls, Small Kitchen: A hearty winter vegetable stew with sweet potatoes, peanuts, edamame, spinach and more.
Let me start off by saying this: 2011 was a great year.
*I turned 30.
*I got the best bunny in the entire world, Little Omar.
*I traveled to Chicago, Las Vegas, Los Angeles, and Seattle.
*My niece, Jubalee, was born in July (and she’s perfect and beautiful and the best little chunk of a baby).
*I finally got to dine at a Thomas Keller establishment (Bouchon in Las Vegas).
*I dyed my hair ‘ombre’.
*I planted my first real garden (thanks to the raised garden beds my husband built for me). I grew: squash (delicata, spaghetti, zucchini), chioggia beets, tomatoes, shallots, carrots, chives, arugula, kale, chard, peppers, and cucumbers.
*I was asked to join the board of the Montavilla Farmer’s Market. (And I accepted, of course).
*I finally got on the Harry Potter bandwagon. I read all the books and watched all of the movies this year, and I’m seriously kicking myself for not reading them sooner.
*In June, I celebrated 2 years of marriage to my best friend.
This is us, looking celebratory (!):
So, yeah, I’d say it’s been a fantastic year.
As for 2012? I’ve got a whole lot to look forward to…
*Hosting the PDX Food Swap (The next one will be in March, 2012!).
*Working with the Montavilla Farmer’s Market, specifically working to help reduce food insecurity through the Everybody Eats program.
*Eating at DOC in Portland – it’s been on my list for ages, and somehow I’ve not had a chance to eat there.
*Taking on new freelance writing gigs, in addition to expanding my wedding coordinating and events business. I have some exciting things in the works!
*Traveling to Europe with my love (The plans are still tenative, but if I write it here, that means we have to go!).
*Planting & growing an even more successful garden!
*Disneyland! (We’re going in January. I’m a total sucker for Disneyland.)
*Vegas in March with a couple of my favorite ladies.
*Trying new things, cooking new things, and learning new things.
—
I’m exciting to grow and change this year. I’m excited for whatever life throws at me. I’m thankful for all that I’ve been given, and I look forward to the new year with a sense of hope and excitement. God is good.
Lastly, I thought I’d share a festive cocktail recipe that is perfect for ringing in the new year. It also happens to be my favorite cocktail of all time: The French 77.
The French 77 is a variation on the classic cocktail, The French 75. The French 75 was created in 1915 at a bar in Paris and the drink was originally made with gin, champagne, simple syrup, and a lemon twist. The name hails from the fact that the cocktail was rumored to “have such a kick that it felt like being shelled with the powerful French 75mm field gun”.
The 77 doesn’t differ much from the 75, but the one slight change makes all the difference (in my humble opinion). The 77 uses Elderflower Liqueur (St. Germain) in place of the simple syrup. The St. Germain adds a sweetness that isn’t too sweet. It’s slightly floral, without being too overpowering. It’s perfect. The cocktail is smooth, balanced, and goes down ridiculously easily. And yes, it certainly has the kick of a French field rifle. This cocktail packs a punch (in the best way).
So, Happy New Year to you and yours! I plan on celebrating with a French 77. Maybe you’ll join me?
The French 77
Note: The drink is often served in a champagne flute, but I like to serve it in a smaller classic cocktail glass.
Ingredients:
2 oz Gin
1/2 oz St. Germain (Elderflower liqueur)
1 oz fresh squeezed lemon juice
2 ounces Champagne (or sparkling wine)
1 small strip lemon zest
Shake together gin, lemon juice, and St. Germain with ice. Strain, and pour into a cocktail glass. Pour champagne float over the top, garnish with lemon zest. Serve immediately.
Makes one cocktail.
Happy New Year, y’all!
We made it through the holidays! High fives all around.
Granted, my house is in shambles and my pants feel like they are two sizes too small. But that’s what the holidays are all about, right? In all seriousness, I had a wonderful Christmas. I spent a lot of quality time with my family (and adorable nieces), I ate a lot good food, and played a lot of Just Dance 3. (In case you were wondering, I’m absolutely horrible at Just Dance 3.)
However, the holidays aren’t technically over yet. We still have to ring in the new year! I’m not one for New Year’s resolutions – namely, I don’t like making promises I can’t keep – but I do plan on making a few dietary changes on January 1st. No, I am not going on a diet. I’m just going back to the way I normally eat. I like eating fruits, veggies, and whole grains. I feel better when I eat healthy and exercise (call me crazy, but I actually like feeling good). So, I’m going to listen to my body and I’m going to cut back on sugar, carbs, alcohol, etc.
But, that starts on January 1st. Meaning: I’ve got a few more days to eat cookies. And so do you!
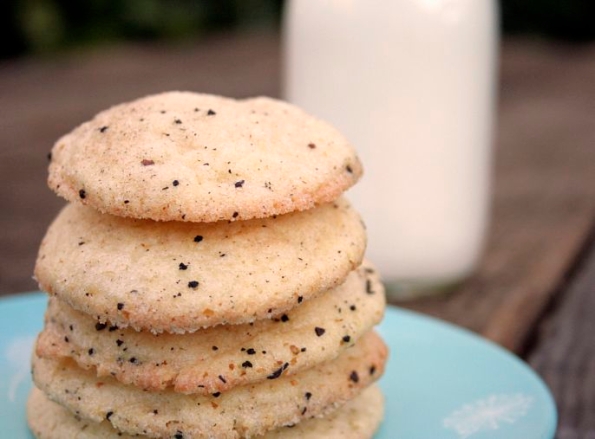
So make these cookies now and gobble them up before your New Year’s resolutions begin. 😉
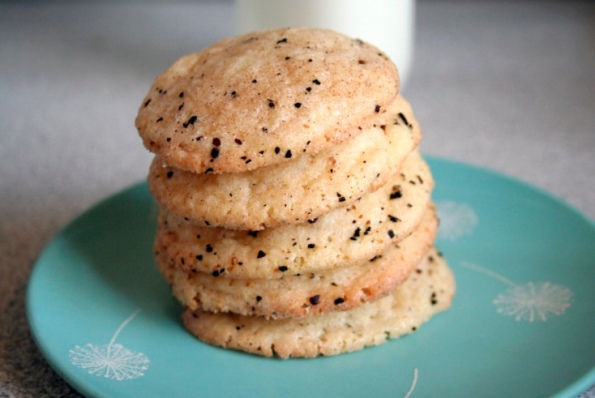
P.S. I’m aware that these cookies may appear to be sprinkled with black pepper, but I can assure you that they are sprinkled with Chai tea leaves (and cinnamon, cardamom, cloves, etc). And I can assure you that they are really, really delicious.
CHAI SNICKERDOODLES
Adapted from The Novice Chef
2 1/3 cups all purpose flour
1 teaspoon baking soda
2 teaspoons cream of tartar**
1/2 teaspoon salt
1 cup unsalted butter (2 sticks), room temperature
1 1/2 cups white sugar
1 teaspoon vanilla
2 eggs
**If you do not have cream of tartar, you can substitute a 1/2 teaspoon of lemon juice.
For the Chai sugar:
5 tablespoons white sugar
2 teaspoons Masala chai tea leaves (Use loose leaf, or empty the contents of a couple of tea bags)
1 teaspoon cinnamon
1/2 teaspoon cardamom
1/4 teaspoon ginger
1/8 teaspoon cloves
1/8 teaspoon nutmeg
Method:
Using a food processor or mortar & pestle, grind the Chai tea until it is fine. Combine chai with the sugar and other spices in a small bowl. Set aside.
In another (medium) bowl, combine dry ingredients.
Using a stand mixer (or hand mixer), cream together butter until light and fluffy. Add eggs, one at a time. Add in vanilla (and lemon juice, if substituting for cream of tartar).
Slowly add dry ingredients to wet ingredients, and mix until combined. Place dough in refrigerator to chill for a half hour.
Meanwhile, preheat your oven to 350 degrees. Line 2 baking sheets with parchment paper (or a Silpat).
Once the dough has chilled, remove from fridge. Using your hands, form dough into large balls (about 1″). Roll each ball in the chai sugar mix, and place on a baking sheet (leave space, as the cookies will expand during baking). Bake for 12-14 minutes, until edges are just barely beginning to turn golden brown. Allow cookies to rest for 5 minutes on cookie sheet before transferring to a cooling rack.
I’m a bit of a nomad. In my short life, I’ve lived in various parts of California (Sacramento, Los Angeles, Orange County, etc.), Alaska, Wyoming, Oregon, along with a very brief stint in Mexico.
I have fond memories of most of these places, but none of them compare to my memories of Alaska. My family and I lived in Anchorage, Alaska for 3 years – from the time I was 8 until I was 11 – and I can honestly say that there is no better place to be a kid. My sisters and I built sled runs in our front yard, we fed moose from our deck, we hiked, skiied, fished, and adventured. Alaska was a magical place for kids. I was too busy being young and wild and free to be bothered by the long, dark days of winter. I loved Alaska.
And to this day, whenever I eat smoked salmon, I can’t help but think about Alaska. During our time there, my parents bought a boat and got really into salmon fishing. One year, my mom caught a 65 pound King salmon (Naturally, we had it stuffed. His name is “Sam the Salmon” and he still hangs on the wall at my parent’s house.). Needless to say, we ate a lot of salmon in those days. We ate so much salmon that I grew tired of it. I remember thinking to myself (or whining, aloud), “Salmon for dinner? Again?”. Only in Alaska, I suppose.
(A photo of us from the Alaska days, with our giant stuffed Salmon. This was our Christmas card photo one year.)
But as much as I whined about salmon for dinner, I never seemed to grow tired of smoked salmon. Specifically, my mom’s smoked salmon. Her smoked salmon is ridiculously good, and strangely addictive. In fact, my favorite snack when I was a kid was Ritz crackers with cream cheese and smoked salmon. I ate it constantly. So, then, this recipe is really just a grown up version of my favorite childhood snack. This is my version of Ritz crackers with smoked salmon and cream cheese.
Sadly, I did not use my mom’s smoked salmon for this particular recipe. The days of Alaska and salmon fishing are long gone, and so I had to resort to purchasing Trader Joe’s smoked salmon. It certainly isn’t my mom’s smoked salmon, but it worked nicely in the context of this recipe (and, it’s really affordable!).
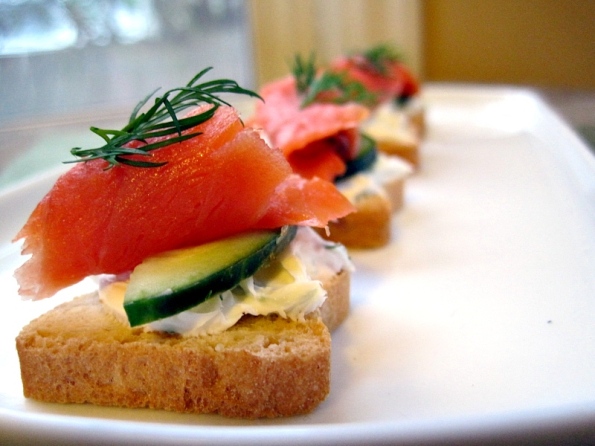
I’ll admit, this isn’t a terribly inventive recipe. In fact, I can hardly call it a “recipe” at all: this is a few key ingredients arranged prettily on a mini toast. But, the tartines are easy to put together, they taste fantastic (who doesn’t like salmon with dill and cucumber?), and they make for an elegant holiday appetizer. In the midst of a busy season, this is exactly the type of holiday appetizer I like to make.
And, with that I’d like to wish you a peaceful and restful holiday. Happy Holidays, everyone!
MINIATURE SMOKE SALMON TARTINES (WITH CUCUMBER AND DILL)
Ingredients:
8 oz smoked salmon, sliced thinly
8 oz cream cheese, room temperature
2 tablespoons minced fresh dill, plus a few extra sprigs of dill for garnishing
1 package of mini toasts (from Trader Joes). You could substitute crostini, melba toasts, etc.
The zest of 1 lemon
Salt & pepper, to taste
1 cucumber
Slice cucumber thinly, using a knife or mandoline. If using the mini toast (or very small piece of bread), cut each cucumber slice in half. If using a larger bread/cracker base, you may leave the slices whole.
Method:
Mix together the cream cheese, lemon zest, minced dill and salt and pepper. Chill until needed.
Make the tartines immediately prior to serving, so that everything is fresh and chilled when eaten. Spread a small amount of the cream cheese mixture on each mini toast. Place a half slice of cucumber atop the cream cheese. Then, place a small roll of smoked salmon atop the cucumber slice (you could just place the smoked salmon on top without rolling it, I just think that the roll adds height and elegance). Garnish with a bit of fresh dill.
It feels good to sit down.
I’m taking a minute for myself. Elf is playing on the television, my (turquoise-themed) Christmas tree is twinkling in the background, and my cat is snuggled up next to me. It’s been a busy month, and I’ve not had many moments to myself recently. I blinked, and before I knew it my December schedule was filled with meetings, holiday parties, food swaps, catering gigs, meetings, baking, cooking, crafting, and so much more.
To be honest, I sort of love the hustle and bustle of it all. I’m the queen of overcommitment and I’m always busy, busy, busy. But, that gets old quickly. In fact, it’s downright exhausting. I have to remind myself to slow down, and to take things one day at a time. I desperately want to enjoy this holiday season, and the only obstacle standing in the way of a peaceful and restful holiday is me.
But, I’m working on it. Baby steps. Tonight, I snuggled with my cat and watched Elf and all felt right.
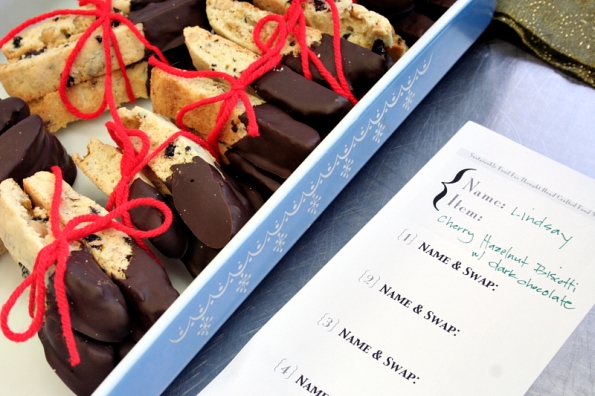
And the cherry hazelnut biscotti? They were part of my holiday stress-reducing plan. I needed something to bring to the PDX Winter Food Swap and I needed a treat to bring to a holiday party. So I made a double batch of biscotti and I killed two birds with one stone. The biscotti were an absolute hit at each event (i.e. they disappeared quickly), they were easy to make, and they crossed two things off my to-do list. Huzzah!
I’d like to say thank you (yet again) to my sister, Danielle, for baking with me. We baked the biscotti together while her baby and my bunny played together on the kitchen floor (and made a giant – but adorable – mess). Baking is so much better with company (if I do say so myself)…
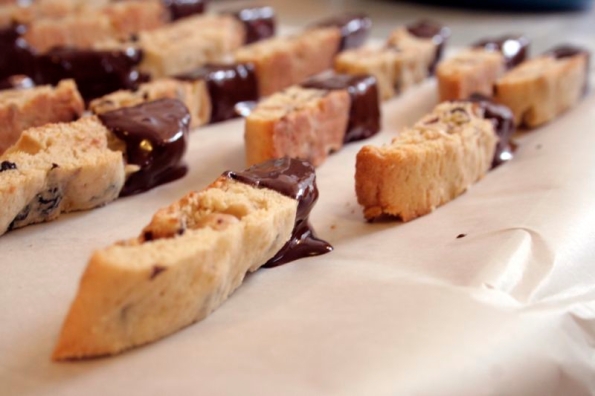
DRIED CHERRY & HAZELNUT BISCOTTI (WITH ORANGE AND CARDAMOM)
Adapted from Williams Sonoma
Note: This recipe could easily be adapted to include various dried fruits and nuts (cranberries, blueberries, dates, pistachios, almonds, pecans, etc), I just used what I had on hand. And, of course, I decided to dip each biscotti in dark chocolate…because it seemed like the right thing to do.
Ingredients:
8 Tablespoons (1 stick) unsalted butter, room temperature
3/4 cup white sugar
2 eggs
2 tsp. vanilla extract
1 3/4 cups all-purpose flour
1/2 teaspoon baking powder
1/2 teaspoon ground cardamom
1/4 tsp. salt
1 cup hazelnuts, toasted and roughly chopped
1/2 cup dried bing cherries, coarsely chopped
1 teaspoon grated orange zest
12 oz. (1 bag) dark chocolate chips (I used extra dark, 60% cacao from Ghiradelli)
Method:
Preheat an oven to 350°F. Line one large baking sheet with parchment paper.
In a large bowl, using an electric mixer (or in the bowl of a stand mixer), beat butter on high speedy, until fluffy (1-2 minutes). Add in the sugar, and continue beating until well combined. Reduce the speed to low, and add in the eggs one at a time. Mix until blended, and then mix in the vanilla.
In a large bowl, sift together dry ingredients: flour, baking powder, cardamom and salt. Gradually add the flour mixture to the egg mixture and beat on low speed or stir with a wooden spoon just until incorporated. Gently stir in the hazelnuts, cherries and orange zest until evenly distributed. The dough should be very soft.
Turn the dough out onto a generously floured work surface and divide in half. With well-floured hands, transfer one-half onto one side of the lined baking sheet and shape into a log about 12″ long and 1.5 inches wide. Repeat with the remaining dough on the other side of the sheet, leaving at least 4 inches between the logs.
Bake the biscotti until the edges are golden, 25 to 30 minutes. Remove from oven and allow to cool for 10 minutes. Gently (and carefully) transfer the biscotti “logs” to a flat surface. Using a serrated knife, cut off slices of biscotti (1/2 inch wide). Place biscotti pieces on the baking sheet (on their side) and bake for 10 minutes more, or until golden. Remove from oven and allow to cool on wire racks.
Optional: Once the cookies have cooled, melt the chocolate chips, using a double boiler. (You could always try the microwave to melt the chocolate, but you can easily overcook the chocolate and then it becomes gritty and gross. I prefer the double boiler method.) Dip each biscotti in the chocolate, coating 1/4 to 1/2 of the cookie (I just like to coat the tip of the biscotti, so I dip it 1/4 of the way in the chocolate). Carefully place each biscotti on a piece of parchment or wax paper, and allow to cool.
Store biscotti in an airtight container. Makes about 2 dozen biscotti.
A photo of my biscotti at the PDX Winter Handmade Food Swap
For thirteenth installment of the Burwell General Store Recipe Swap, we’re switching things up!
For the past year, we’ve been remaking recipes from a funny old cookbook (and hymnal!) called All Day Singin’ and Dinner on the Ground. I don’t personally own the book, but I feel a connection to it as I’ve been making (or re-making) recipes from it for a year now. I love how old timey the book is and how utterly simple the recipes are. For most of the recipes, the instructions are a few mere sentences.
As you may recall, last month was the year anniversary of the Recipe Swap. To celebrate, all the recipe swappers were asked to make our own versions of a Maple Syrup Cake. I went with a Butternut Squash Layer Cake with Maple Cream Cheese frosting (and yes, it tasted every bit as good as it sounds). The cake was the perfect way to celebrate the year anniversary of a group I’ve grown so fond of.
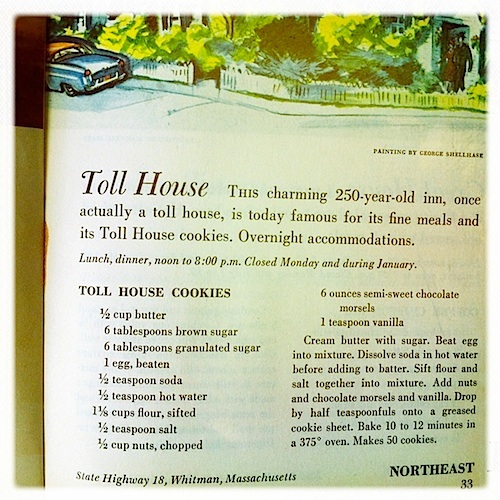
However, going forward, we’re going to be making recipes from a new book: The Second Ford Treasury of Favorite Recipes From Famous Eating Places.
I’m not what you would call an inflexible person, but some might describe me as stubborn. When I heard that we were going to be using a new cookbook, I was dubious. I’d grown rather fond of our funny little cookbook! I wasn’t quite ready to say goodbye to All Day Singin and Dinner on the Ground. But, then I realized that introducing a new book to the group only further encourages creativity in the kitchen and will bring a whole new set of interesting recipes to recreate. I’m all for creativity in the kitchen, and so I set aside my hesitations and decided to embrace the new book.
It probably didn’t hurt that the first recipe that Christianna selected from the new book was a recipe for the classic Tollhouse Cookie. I mean, seriously, what’s not to like about the Tollhouse cookie? It is the epitome of classic recipes; it is the ultimate chocolate chip cookie.
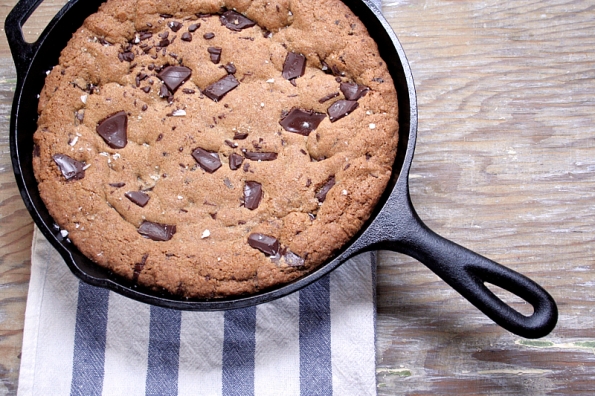
I was slightly flustered by the idea of remaking such a classic, so I decided to give the Tollhouse cookie a slight twist. I didn’t want to do anything TOO crazy, as I’m a big fan of the original Tollhouse cookie. I wanted to make something that paid proper homage to the original recipe, and yet updated it at the same time. So, I made one giant whole wheat chocolate chip cookie in a cast iron skillet and sprinkled it with sea salt.
The cookie was rich, chewy, dense, and was the perfect marriage of sweet and salty. The whole wheat flour added density and flavor (and I’d like to pretend that it means this cookie is healthy). At the end of the day, I loved this recipe because it tasted like everything I want out of a chocolate chip cookie. The dark chocolate, whole wheat, and seat salt work so well together. This is the perfect (giant) cookie.
I didn’t attempt to improve on the original Tollhouse cookie as I believe that is an impossible feat. But, I took the spirit of that recipe and I made it my own. I baked it in a cast iron skillet. I sliced off a big old wedge of cookie and ate it warm with vanilla bean ice cream. And I was happy (!).
All that to say: happy recipe swap, y’all. I hope you found as much happiness in your Tollhouse recreations as I did. I certainly had a good time.
“Cast Iron Skillet Cookie”: Whole Wheat Chocolate Skillet Cookie
Adapted from 101 Cookbooks
3 cups whole wheat flour
1 1/2 teaspoon baking powder
1 teaspoon baking soda
1 1/4 teaspoon fine grain sea salt
8 ounces (2 sticks) cold unsalted butter, cut into small cubes, plus more for buttering the pan
1 cup dark brown (or muscovado) sugar
1 cup white sugar
2 large eggs
2 teaspoons pure vanilla extract
1/2 teaspoon nutmeg
6 ounces bittersweet or dark chocolate, roughly chopped into small pieces (I used lightly salted dark chocolate from Lindt)
High quality sea salt, for finishing
Preheat the oven to 350°F. Butter a 10 (or 11″) cast iron skillet, that is at least 2″ deep (this is important! if the skillet isn’t deep enough, it will overflow).
Sift the dry ingredients into a large bowl.
In another large bowl (or in the bowl of a stand mixer fitted with the paddle attachment) add the chilled butter and the white and brown. Mix just until the butter and sugars are blended (low speed), about 2 minutes. Use a spatula to scrape down the sides of the bowl along the way. Add the eggs one at a time, mixing until each is combined. Mix in the vanilla. Add the flour mixture to the bowl and blend on low speed until the flour is barely combined, about 30 seconds. Scrape down the sides and bottom of the bowl.
Add most of the chocolate to the batter and mix until the chocolate is just incorporated. Use a spatula to scrape the batter out into the skillet, pressing it into an even layer. Sprinkle any remaining chocolate across the top and sprinkle a bit of high quality sea salt over the top.
Bake the cookie for 35-45 minutes, or until until the dough is a deep golden brown along the edge, and the center has set. Remove from oven and let cool before slicing. Cut into wedges (or squares). Best served warm with a scoop of vanilla ice cream.
Please see below for all the other fantastic contributions to this recipe swap!
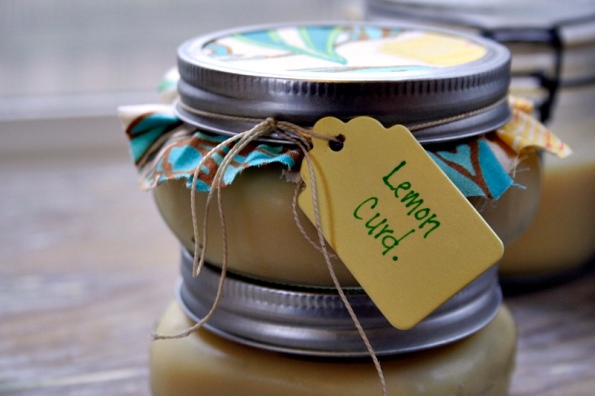
This post is only slightly different than my handmade holiday post from last year. I was reading over last year’s post (to gain inspiration for this year) and I realized that it said everything that I want to say. I liked it so much that I just decided to repost it for this year. However, I changed out the recipe – last year I made Spicy Brown Mustard, and this year I went with a Meyer Lemon Curd. In addition, I’ve updated and added to my list of homemade and DIY gift ideas. Lastly, I’ve included a few links to organizations that you can donate to in lieu of giving gifts. I think that about covers it, so please read below.
~~~
This time of year is just so overwhelming. It seems that every year, the advertisements get louder, the Black Friday lines get longer, and the things I love about Christmas are seemingly lost in the throes of American consumerism. It all just seems so Charlie Brown, if you know what I mean. And I get so discouraged by insanity of it all! I feel like I need my own personal Linus to come remind me what Christmas is all about.
At the end of the day, I believe that Christmas is about a Savior who came to earth. It’s as simple as that. And whether or not you share my beliefs on Christmas, I do hope that we can all agree that there is something disconcerting about the modern American Christmas. The holiday has become a hallmark of greed, materialism, stress, waste, and so much more. But it doesn’t have to be this way.
For the past few years, my family and I have participated in the phenomenon that is known as The Advent Conspiracy. The Advent Conspiracy is trying to change how we do Christmas. Their motto is simple: Love All. Spend Less. Give More. I was struck by the simplicity of the statement: so much truth in so few words. To expand upon the motto, essentially The Advent Conspiracy challenges people to change their Christmas spending habits. Instead of spending bunches of money on traditional gifts, they challenge people to instead use that money to do good. They do not suggest that you forgo all gifts entirely, rather they encourage people to give thoughtful and handmade gifts, the gift of time (i.e. babysitting for someone, cooking a meal for someone), and other such gifts. (For more info, watch their fantastic promo video here.)
So, my family and I have done just that. We’ve gotten really creative with our gifts – it’s usually a combination of handmade items, secondhand items, or things purchased from local businesses. There are no hard and fast rules, we just do the best we can. And maybe I’m crazy, but I take so much joy in the process. For me, this is what Christmas is all about (Ahem…Charlie Brown). It is about taking the time to invest in those that you love, to gift meaningful and thoughtful gifts, and to use your resources in a way that will benefit others.
That’s my reasoning for making a lot of my Christmas gifts, anyway. I’m not particularly crafty, but every year I challenge myself to try something new. This year, I’m making a few darling yarn wreaths, as well as Meyer Lemon Curd, Crema di Limoncello, Apple Butter, and a few other fun things that I’m not allowed to mention (yet). I haven’t personally tried all the recipes and/or crafts on this list, but they’re all on my list of “things to eventually make”.
I hope that you’re inspired this holiday season, and a happy handmade holiday to all of you.
A HANDMADE HOLIDAY ROUNDUP: GIFT IDEAS FOR YOU AND YOURS!
*Yarn Wreaths with Felt Flowers
*Homemade Creme de Menthe
*Grapefruit Cranberry Marmelade
*Crema di Limoncello
*Cute Little Marble Magnets
*Homemade Vanilla Extract
*The Cutest Little Holiday Snow Globes
*Moss Terrarium | Tiny Terrarium | Hanging Succulent Terrarium
*Chai Tea Mix
*Ina Garten’s Chipotle and Rosemary Spiced Nuts
*Hot Chocolate on a Stick
*Vodka Infusions (Rosemary Lavender & Rhubarb)
*Pumpkin Butter
*Basil & Wine Jelly
*Balsamic Fig Thyme Jam
*Hazelnut-Lavender-Coconut Granola
*Maple Cinnamon Granola
*(Really Cool) Vintage Tin Candles
*Spice Blend: Herbs De Provence
*Vanilla Sea Salt
*Homemade Curry Powder
*Slow Cooker Apple Butter
*DIY Reed Diffuser (Air Freshener)
WAYS TO GIVE TO OTHERS:
I highly encourage any/all of you to give back this holiday season. Here are just a few (of many) organizations that could benefit from your charitable donations:
Give a goat to a family in need (via Oxfam)
Clean Water for Haiti
The International Justice Mission
The Oregon Food Bank
Women for Women: The Women of South Sudan
Chickens for Christmas
No Kid Hungry: Share Our Strength
And finally, here’s one of my absolute favorite recipes for gift giving!
Meyer Lemon Curd
Confession: I’ve already posted recipes for Lime Curd and Grapefruit Curd on my blog, so at this point I think I’m what you’d call a “curd enthusiast”. But, my aunt gave me a whole bag of Meyer Lemons from her trees in Palm Springs, California. I had no choice but to make Meyer Lemon Curd!
1 and 1/2 Cups of fresh squeezed Meyer lemon juice* (from 10-12 lemons)
10 tablespoons of chilled unsalted butter, cut into 1/4 inch cubes
6 eggs, plus the yolk of one egg
Zest of 2 lemons (cut into large pieces for easy retrieval)
1 cup of sugar
1/2 teaspoon vanilla extract
*If using normal lemons instead of Meyers, you may need to add a touch more sugar.
Method:
Juice the lemons. Rolling the lemons with your palm on the counter will yield much more juice. Pour juice through a strainer or cheesecloth to remove any seeds and large bits of pulp.
In a saucepan, whisk the eggs (and yolk) together. Add in lemon juice and sugar, and whisk until well combined. Turn your stovetop on, and gradually heat up the mixture over medium-low heat, whisking constantly. Once the mixture is warm, turn the heat up to medium and add in the strips of zest. Next, begin to add the butter pieces, bit by bit, whisking the whole time. Continue whisking, adding butter all the time, until you’ve added all the butter. Continue whisking, being careful not to burn (or allow the eggs to curdle), and cook for 7-10 minutes, or until curd is thick and creamy.
Remove from heat and cool at room temperature for an hour. I put a piece of plastic wrap over it (so a film doesn’t form on top). Transfer to sterilized jars. These can be stored in the fridge for up to 3 weeks.
Pho: (Pronounced: Fuh) A Vietnamese noodle soup, typically made with beef broth and thin rice noodles, usually garnished with basil, bean sprouts, and lime.
I was dithering back and forth about posting this recipe, as I was worried that it might sound fancy, complicated or inaccessible. And while I like to cook fancy food from time to time, ultimately I want my recipes to be accessible. I want to post things that you want to cook.
The thing I want to stress about this recipe is that it only sounds complicated. It really isn’t! The whole idea to make duck pho came about when I saw a recipe for Turkey Pho (made with Thanksgiving leftovers! Genius!). As I mentioned in my last post, since I didn’t roast a turkey this year, I decided to roast a duck. In all actuality, my wonderful husband roasted the duck while I was at the gym. Let me tell you, coming home to roast duck (prepared by the person you love) is a really great thing.
So, we ate the roast duck (and holy smokes, it was good) and when we were finished, we had a whole duck carcass on our hands. We had no choice but to make duck stock! And since we made duck stock, making duck pho seemed to be the next logical step. So that’s just what we did.
For the record, this recipe could easily be made with chicken or turkey. I happened to roast a duck, hence why I made this pho with duck. I don’t often roast ducks (read: this was the first time), but I do roast chickens relatively frequently, so I see a lot of chicken pho in my future. I’ve always thought of chicken pho as a better version of chicken noodle soup. In fact, whenever I’m not feeling well, all I really want to eat is pho. I’m not sure why I’ve never attempted to make it until now, I think I always assumed it was really complicated. All it requires is a bit of time to make the stock (which can simmer away while you do other things, like decorate your Christmas tree! Which is exactly what I did.), and a few key Asian pantry ingredients.
Making pho a great way to use up leftovers (whether it be duck, turkey, chicken, etc), and it’s the perfect rainy day meal. I’m not sure if you’ve heard, but we get a lot of rainy days in Portland. 😉 But pho is the perfect remedy for rain: it fills the belly, warms the insides, and clears your head.
Duck Pho
(Adapted from Serious Eats)
Leftovers from 1 roast duck (i.e., 1 duck carcass, wings and legs included)
1 yellow onion, roughly chopped
2 cloves garlic, smashed
6 whole cloves
2 cinnamon sticks
3 star anise pods
1/2 teaspoon coriander seeds
6 sprigs fresh cilantro
2 tablespoons fish sauce
1/2 teaspoon ground black pepper
2 dried shittake mushrooms
Salt, to taste
Thin rice noodles
Garnishes:
Bean sprouts
Sriracha
Hoisin sauce
Lime wedges
Green onion, sliced thinly
1-2 jalapenos, sliced thinly (seeds included)
Cilantro (and/or Thai basil)
Remove any leftover meat from the duck, set aside for use in the pho.
To make duck stock (pho soup base): Heat 1 tablespoon of olive oil over medium-high heat in a large stock pot. Cook the onion, until starting to brown, 5 minutes or so. Add in duck bones, and fill the pot with cold water. Add in star anise, cinnamon, coriander, cloves, cilantro sprigs, garlic, and shitaake. Bring to a boil, then turn the heat down and allow the stock to simmer for 1-2 hours.
Strain the stock into another pot. Add in fish sauce, salt, and ground pepper to taste. Start with the addition of fish sauce, and add salt afterwards if needed (fish sauce is very salty). If serving pho immediately after making stock, allow stock to simmer over low heat on the stove. Add in duck meat and sliced green onions, and allow to cook in the broth for a few minutes before serving.
To assemble pho: Cook rice noodles according to the package directions. Drain, and place an equal amount of rice noodles in each bowl (I made 4 servings) and pour the hot broth (with duck meat and green onions) over the noodles. Garnish with bean sprouts, lime wedges, jalapeno slices, cilantro, Thai basil, and a hefty dose of Sriracha.
Note: I had about a quart of duck stock leftover after 4 large servings of pho were consumed.

